By Osama Ather
Hey, guys today we at Pakiholic are gonna address all the fitness fanatics out there. We understand the pressure to have an aesthetic body nowadays is through the roof, so for all those dudes who are looking to target those muscle groups and chisel them to a Greek god level, here are 5 core exercises that you need to incorporate in your workout. Within no time it’ll help you create the perfectly balanced, strong and aesthetic physique that you always wanted.
- Shoulder Press
When working towards a hulking physique, or just a slightly stronger upper body, it’s vital to give the shoulders their fair share of attention. Even the bulkiest arms will struggle to impress if they’re hanging off coat-hanger shoulders. Fortunately, the road to broad, strong shoulders is a simple one to start along: here’s the shoulder press

Directions:
- Sit on a bench with back support in a squat rack. Position a barbell at a height that is just above your head. Grab the barbell with a pronated grip (palms facing forward).
- Once you pick up the barbell with the correct grip width, lift the bar up over your head by locking your arms. Hold at about shoulder level and slightly in front of your head. This is your starting position.
- Lower the bar down to the shoulders slowly as you inhale.
- Lift the bar back up to the starting position as you exhale.
- Repeat for the recommended amount of repetitions.

2. Chin Ups
The chin-up (also known as a chin or chin-up) is a strength training exercise. People frequently do this exercise with the intention of strengthening muscles such as the latissimus dorsi and biceps, which extend the shoulder and flex the elbow, respectively. It is a form of pull-up in which the range of motion is established in relation to a person’s chin.


Directions:
- Grab the pull-up bar with the palms facing your torso and a grip closer than the shoulder width.
- As you have both arms extended in front of you holding the bar at the chosen grip width, keep your torso as straight as possible while creating a curvature on your lower back and sticking your chest out. This is your starting position. Tip: Keeping the torso as straight as possible maximizes biceps stimulation while minimizing back involvement.
- As you breathe out, pull your torso up until your head is around the level of the pull-up bar. Concentrate on using the biceps muscles in order to perform the movement. Keep the elbows close to your body. Tip: The upper torso should remain stationary as it moves through space and only the arms should move. The forearms should do no other work other than hold the bar.
- After a second of squeezing the biceps in the contracted position, slowly lower your torso back to the starting position; when your arms are fully extended. Breathe in as you perform this portion of the movement.
- Repeat this motion for the prescribed amount of repetitions.
3. Deadlift:
Deadlift refers to the lifting of dead (without momentum) weight, such as weights lying on the ground. It is one of the few standard weights training exercises in which all repetitions begin with dead weight. There are several positions one can approach when performing the deadlift, which include the conventional deadlift, squat and sumo-deadlift. In most other lifts there is an eccentric (lowering of the weight) phase followed by the concentric (lifting of the weight) phase. During these exercises, a small amount of energy is stored in the stretched muscles and tendons in the eccentric phase, if the lifter is not flexible beyond the range of motion. Although this exercise uses the hips and legs as the primary movers, it can just as easily be considered a back exercise.


Directions:
- Your feet should be spaced hip-width apart with your grip just outside your legs.
- Use an overhand grip.
- Your back should be flat—neutral spine—from start to finish.
- Your shoulders should be back and down.
- The bar should remain in contact with your legs for the entire range of motion.
- Your hips and knees should move together to transfer the bar from the ground to an upper-thigh, locked position.
4. Front Squat
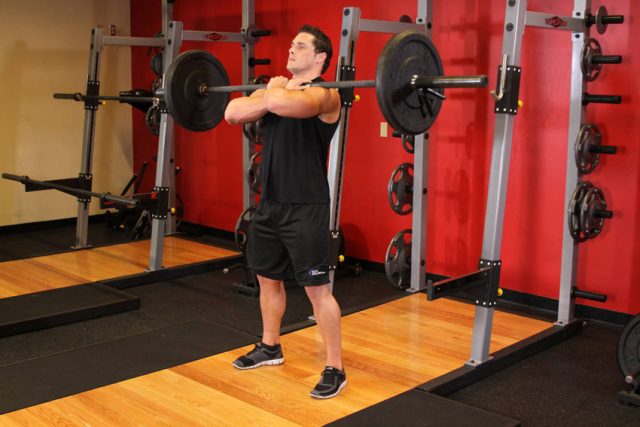
The Front Squat is a lower-body exercise that will strengthen your legs and hips, particularly your quads (thigh muscles) and glutes (butt muscles). Front Squats are similar to Back Squats; however, the barbell is placed on the front side of your shoulders instead of your upper back.
Directions:
- This exercise is best performed inside a squat rack for safety purposes. To begin, first set the bar on a rack that best matches your height. Once the correct height is chosen and the bar is loaded, bring your arms up to the bar while keeping the elbows high and the upper arm slightly above parallel to the floor. Rest the bar on top of the deltoids and cross your arms while grasping the bar for total control.
- Lift the bar off the rack by first pushing with your legs and at the same time straightening your torso. Step away from the rack and position your legs using a shoulder width medium stance with the toes slightly pointed out. Keep your head up at all times as looking down will get you off balance and also maintain a straight back. This will be your starting position. (Note: For the purposes of this
- The discussion we will use the medium stance described above which targets overall development; howeve, you can choose any of the three stances described in the foot positioning section).
- Begin to slowly lower the bar by bending the knees as you maintain a straight posture with the head up. Continue down until the angle between the upper leg and the calves becomes slightly less than 90-degrees (which is the point in which the upper legs are below parallel to the floor). Inhale as you perform this portion of the movement. Tip: If you performed the exercise correctly, the front of the knees should make an imaginary straight line with the toes that is perpendicular to the front. If your knees are past that imaginary lines (if they are past your toes) then you are placing undue stress on the knee and the exercise has been performed incorrectly.
- Begin to raise the bar as you exhale by pushing the floor mainly with the middle of your foot as you straighten the legs again and go back to the starting position.
- Repeat for the recommended amount of repetitions.

 5. Dips
The dip or push-ups is an exercise used in strength training. Narrow, shoulder-width dips primarily train the triceps, with major synergists being the anterior deltoid, the pectoralis muscles (sternal, clavicular, and minor), and the rhomboid muscles of the back (in that order).Wide arm training places additional emphasis on the pectoral muscles, similar in respect to the way a wide grip bench press would focus more on the pectorals and less on the triceps.
Directions:
- For this exercise, you will need access to parallel bars. To get yourself into the starting position, hold your body at arm’s length (arms locked) above the bars.
- While breathing in, lower yourself slowly with your torso leaning forward around 30 degrees or so and your elbows flared out slightly until you feel a slight stretch in the chest.
- Once you feel the stretch, use your chest to bring your body back to the starting position as you breathe out. Tip: Remember to squeeze the chest at the top of the movement for a second.
- Repeat the movement for the prescribed amount of repetitions.

Open source


